Wednesday, September 4, 2019

How to install and configure VMware PowerCLI version 10


How to install and configure VMware PowerCLI version 10


VMware PowerCLI is a collection of Windows Powershell modules which are used to manage and maintain a VMware virtual environment. PowerCLI is a great tool for system administrators and can be used to gather detailed information and/or execute bulk commands against multiple VMsHostsNetwork or Storage devices.
It is typically installed on Microsoft Windows based operating systems. A desktop or server must have network access to the VMware vCenter server(s) and be capable of running a minimum of Windows PowerShell 2.0 with .NET 3.5 SP1 pre-installed. However, it is highly recommended to install the very lastest official releases of Powershell and PowerCLI modules.
This step by step procedure is to prepare your system to run VMware PowerCLI Version 10 (released February 2018), configure shortcuts to your infrastructure and make the first connection to your vCenter server(s).
For this demonstration we are using Windows Server 2012 R2 (64 bit) to connect to a VMware ESXi 6.5 vCenter server. The user accounts have administrator rights in Windows & VMware.
  1. Check which version of Powershell is being used, and if applicable update it to the latest release (version 5 at time of writing).
  2. Open Powershell.
    • Always use ‘Run as Administrator’ privileges. This can be done by navigating to (C:\Windows\System32\WindowsPowerShell\v1.0\powershell.exe) or search for Powershell on the start menu, right click on the powershell.exe application and choose Run As Administrator. You can also right click on any start menu or desktop shortcuts you may already have for Powershell.
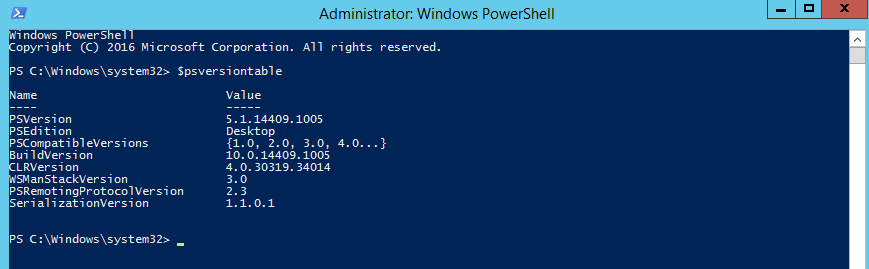
  3. Type $psversiontable – this will tell you what version you are running. Look for the field “PSVersion”.  In this example, I am running PSVersion 4.0:Powershell check $psversiontable
  4. Upgrade your version of Powershell.
    • To do this you will need to install Windows Management Framework (WMF) 5.1.
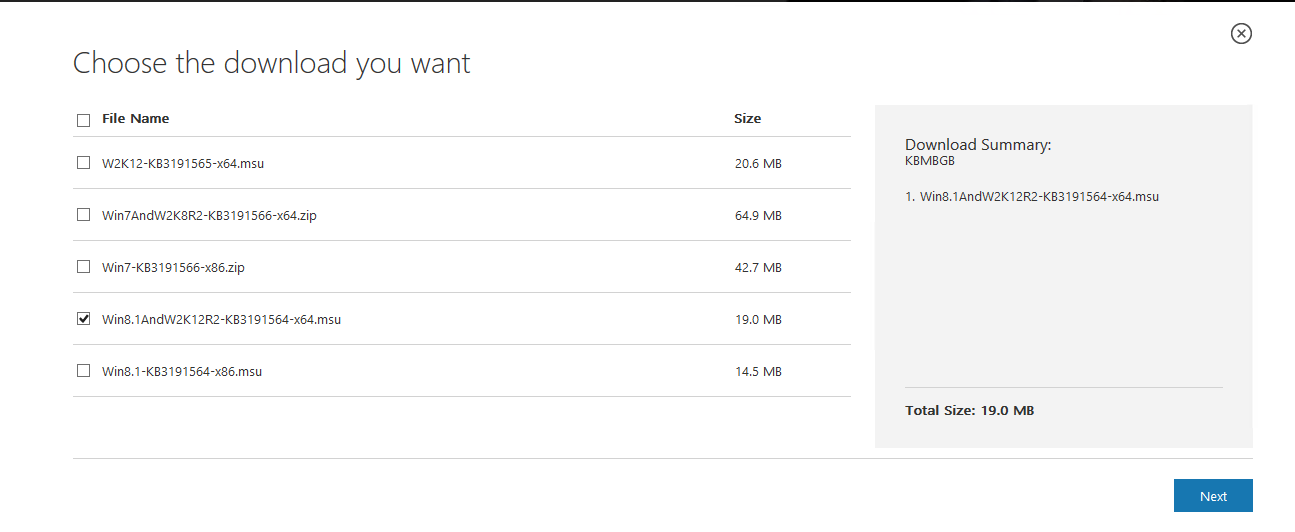
    • Go to https://www.microsoft.com/en-us/download/details.aspx?id=54616:Install Windows Management Framework WMF
    • Select Download and then choose the version applicable to your operating system (in this example I have chosed the 64 bit version for Windows Server 2012 R2; if you are running Windows 10 (Creators Update) or Windows Server 2016, WMF is pre-installed by default):Choose WMF download KB
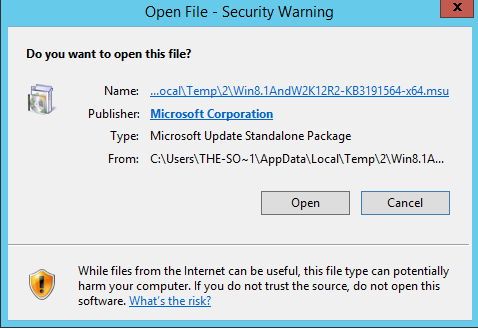
    • Once you have downloaded the .MSU file,  Open it to start the WMF installer:WMF Installer open
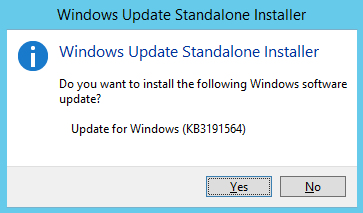
    • You will then be prompted to install the WMF 5.1 update, click Yes:WMF Installer open yes
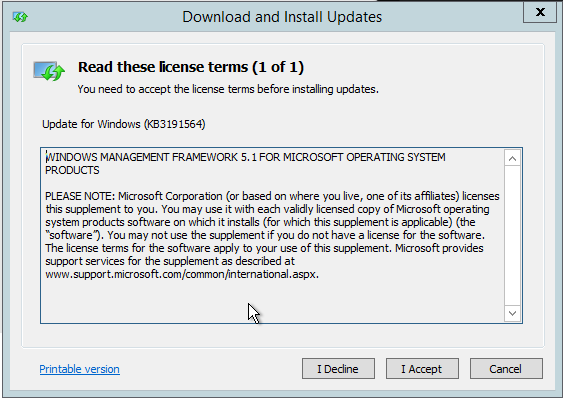
    • Accept the licence terms:WMF Installer licence terms
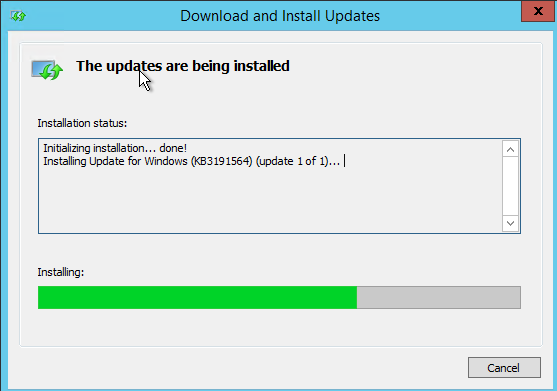
    • The Update will install:WMF Installer download and install
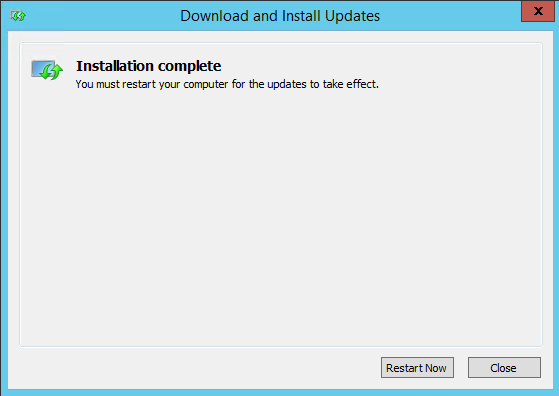
    • Once the installation is completed, Reboot your server:WMF Installer reboot server
    • After your server has rebooted, open Powershell (as administrator) and type $psversiontable to confirm you are now running PSVersion 5.1.
    • WMF5.1 adds many features to Powershell but importantly it enables the ability to update modules directly from the Shell itself. If you are familiar with Linux, Powershell will now work like yum or apt-get when installing modules:Powershell - check version after WMF installation
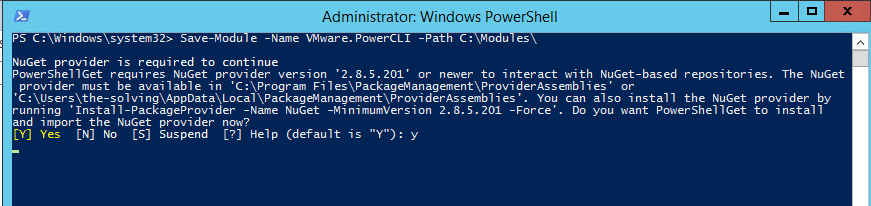
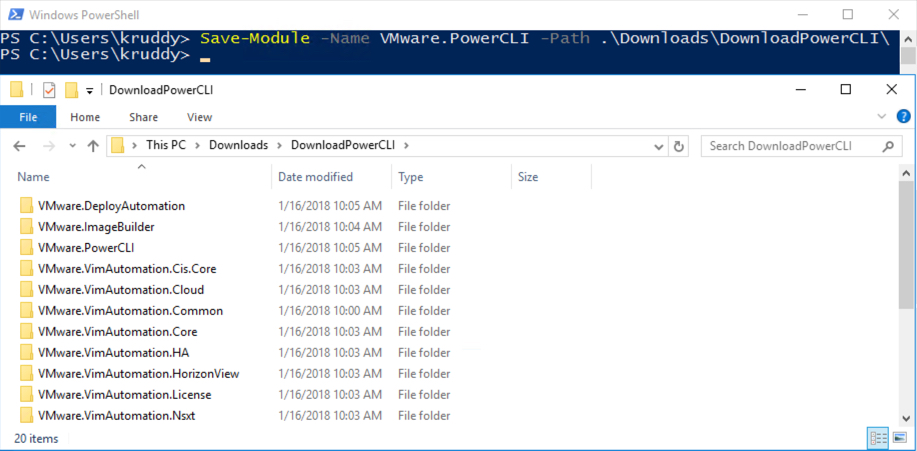
  5. Download and Install VMware PowerCLI module
    • From your Powershell prompt enter:
      Save-Module -Name VMware.PowerCLI -Path <path>
      
    • Ensure you edit your path in the code above to your Powershell module path or any location you want to keep your modules [ eg. C:\Modules ]
    • You will be prompted to approve the install – always select [Y] YES:PowerCLI - Save Modules locally
    • Please note this process can take several minutes. You will see Powershell download all the modules. Once this is completed, Powershell will return to the default prompt:PowerCLI - Save Modules locallyPowerCLI - Save Modules locally
    • You can verify the files have downloaded by navigating to the path you chose to download too:PowerCLI - Module folder
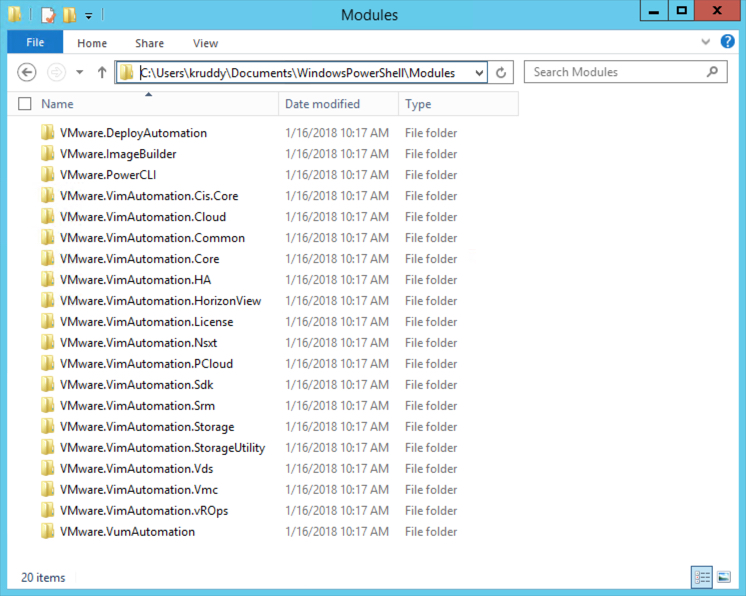
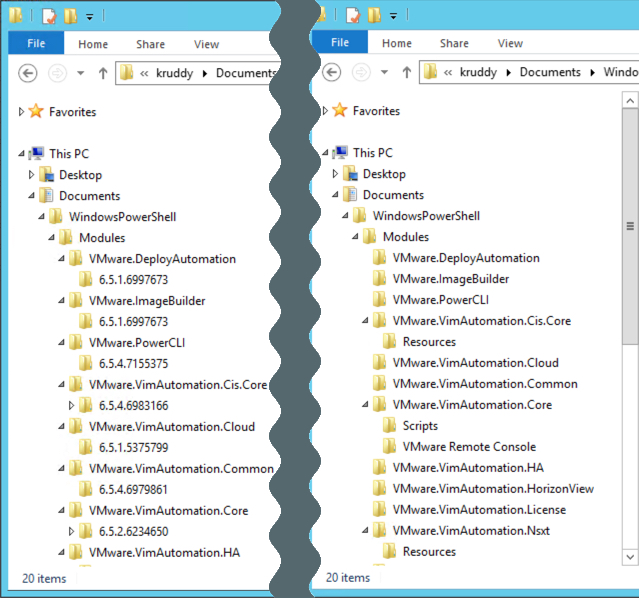
    • Next you must install the modules into Powershell:
      Install-Module -Name VMware.PowerCLI
    • You will be asked to trust the installation, select [Y] Yes:PowerCLI - install modules
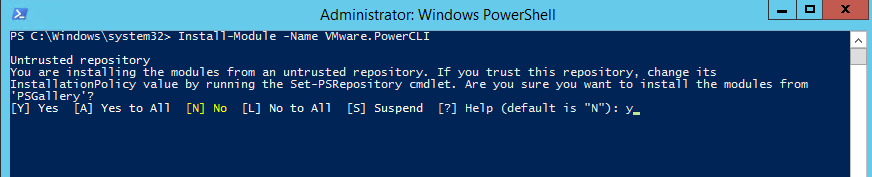
    • This process can take several minutes to complete:PowerCLI - install modules
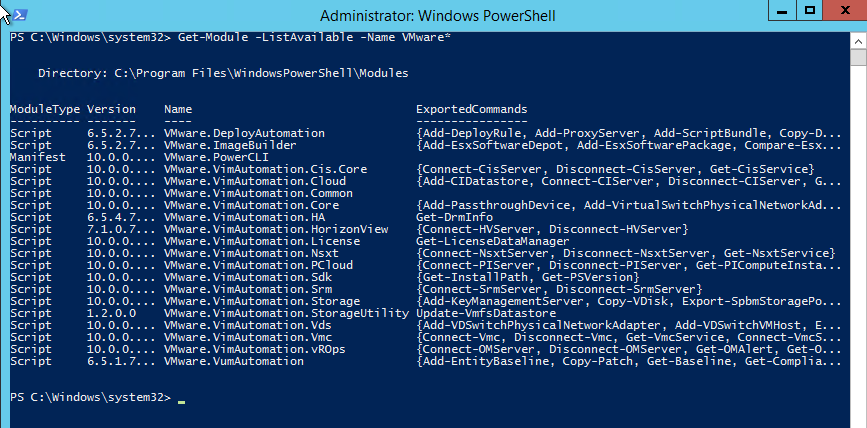
  6. Once completed, next you need to test the PowerCLI module is installed and available to PowerShell
    • Simply type Get-Module -ListAvailable -Name VMware* to ensure Powershell has installed the PowerCLI
      Get-Module -ListAvailable -Name VMware*
    • You are looking for output as below:PowerCLI - install modules check get-module -list available -name VMWare*
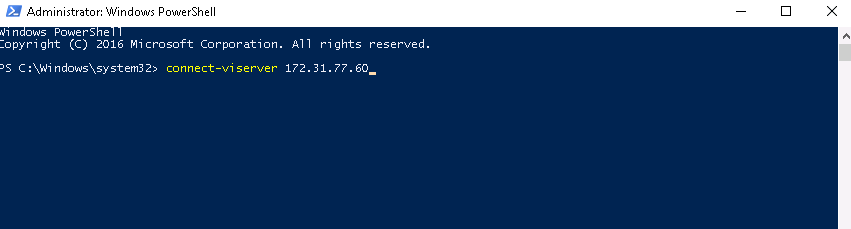
  7. The first task to complete to ensure PowerCLI is correctly installed is to connect to your vCenter server via IP or DNS name.
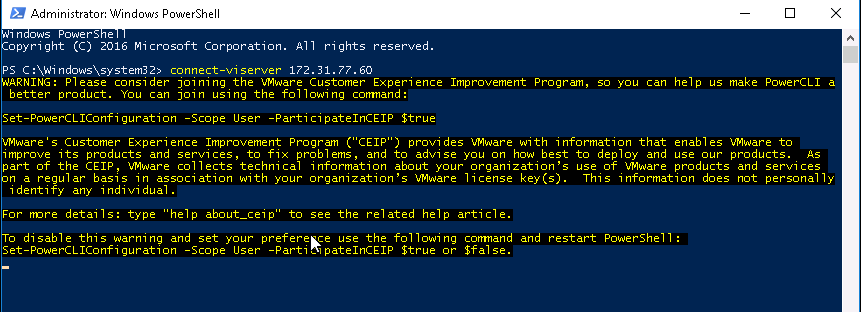
    • type connect-viserver  YOUR IP ADDRESS:PowerCLI - Connect-viserver
    • Yellow verbose text will be displayed as the connection to vCenter is established:PowerCLI - connect-viserver verbose 
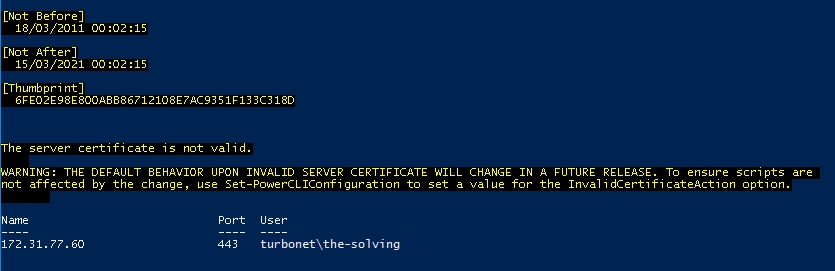
    • Depending on your user account priviledges, you may be asked to log in, if you are, enter your credentials for the vCenter server
    • You are connected to vCenter when you see this output from the shell. It displays the vCenter IP, the User connected and the port used:PowerCLI - connect-viserver connected
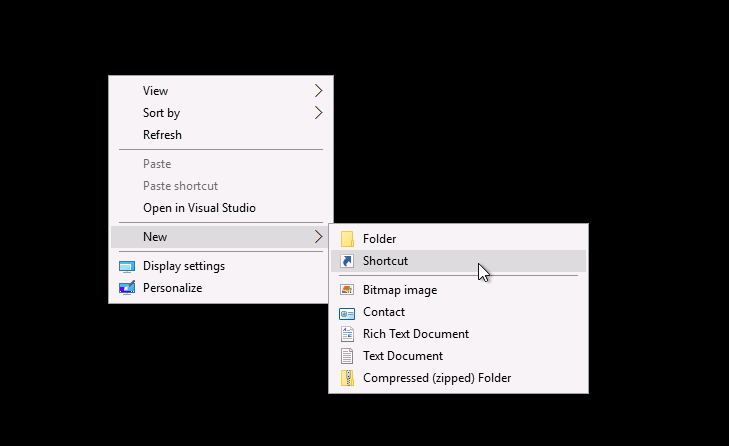
  8.  Now that you have confirmed you can connect, it is recommended to create a shortcut to automatically connect to your vCenter server so you are not manually connecting every time.
    • On your Desktop, Right Click and Select new Shortcut:PowerCLI - create shortcut
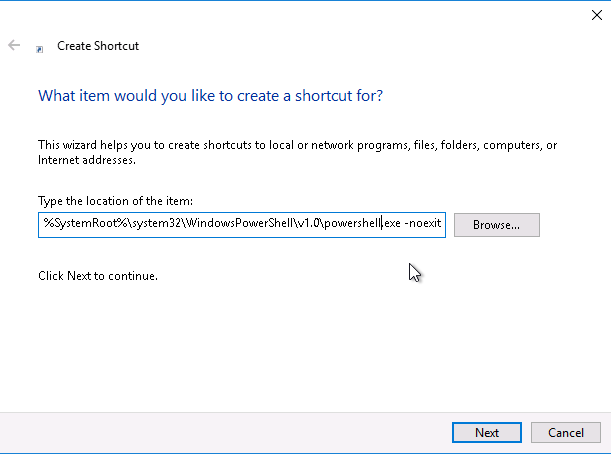
    • In the “Type your location” window enter %SystemRoot%\system32\WindowsPowerShell\v1.0\powershell.exe -noexit -command “connect-viserver YOUR-VCENTER-SERVER1 , YOUR-VCENTER-SERVER2 (Ensure you substitute your Actual IP addresses):PowerCLI - create shortcut location
    • Click Next and Enter a name for your shortcut (eg. PowerCLI Site X or PowerCLI Site Y):PowerCLI - create shortcut name
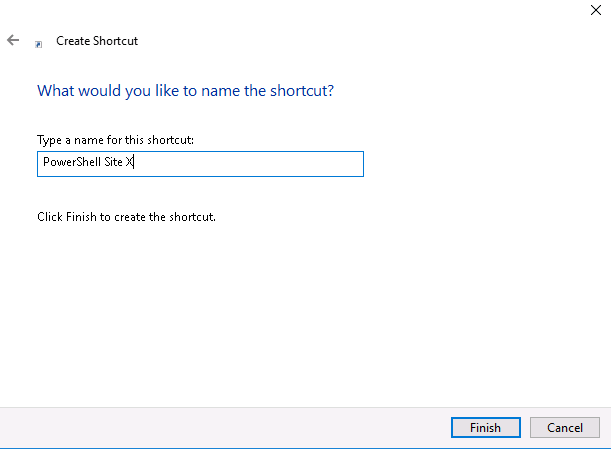
    • Click Finish to complete the process. You can now double click your new shortcut to directly connect to the vCenter Servers with PowerCLI
Share: Facebook Twitter Linkedin


Comments

Friday, August 30, 2019

How to Install VMWARE Power CLI on offline systems.


https://blogs.vmware.com/PowerCLI/2018/01/powercli-offline-installation-walkthrough.html

PowerCLI Offline Installation Walkthrough


Can you believe it? PowerCLI is closing in on a year of being in the PowerShell Gallery! We’re up to 20 different modules and, wait for it, over 2,000,000 downloads of those modules!
VMware Profile on PowerShell Gallery
As exciting as that is, there’s still quite a few questions on how to install PowerCLI to systems that do not have internet access. We’re going to take a much closer look at that with this post.

Preparing the Offline System

First things first, we need to uninstall any prior instance of PowerCLI that was installed by way of the MSI. This can be done by:
  • Open the Control Panel
  • Look beneath the ‘Programs’ section, select ‘Uninstall a Program’
  • Select ‘VMware PowerCLI’, click ‘Uninstall’
Uninstalling Prior PowerCLI Versions
One last thing to check, ensure there is no folder containing PowerCLI as part of the title in the following directory: C:\Program Files (x86)\VMware\Infrastructure\
We can verify whether such a folder exists or not with a oneliner:

Accessing the PowerCLI Modules

We’re now ready to download the PowerCLI modules. This task will require a system with internet access. This section has a couple of variables which depend on the version of PowerShell available on your online system and whether or not you’ve ever accessed the PowerShell Gallery previously by way of the PowerShellGet module.
The easiest way to figure out which version of PowerShell you have is by using the PSVersionTable variable. Based on the output of that, follow the set of instructions below that matches the output.
PowerShell PSVersionTable Output

Online System with PowerShell 5.x:

  • Open PowerShell
  • Use the ‘Save-Module’ cmdlet to download the PowerCLI modules locally. Example:
    • If requested, update the NuGet provider
    • If requested, trust the ‘Untrusted repository’ that is named PSGallery
      Note: This is a local system trust, not something that has something to do with an SSL certificate
  • Copy those downloaded module folders to a location that can be made accessible to the offline system.
    Example: USB Flash Drive, Internal File Share, etc.
Online systems with the older PowerShell versions of 4.0 or 3.0, may need to have an additional module installed to access the PowerShell Gallery. The module is called ‘PowerShellGet’. We can verify whether the online system has the ‘PowerShellGet’ module available with the following command:
If there’s a response, you have it already! If there’s no output, you’ll need to make it available. Depending on the output, follow the instructions below.

Online System with PowerShell 4.0 or 3.0 with the PowerShellGet module:

  • Open PowerShell
  • Use the ‘Save-Module’ cmdlet to download the PowerCLI modules locally. Example:
    • If requested, update the NuGet provider
    • If requested, trust the ‘Untrusted repository’ that is named PSGallery
      Note: This is a local system trust, not something that has something to do with an SSL certificate
  • Copy those downloaded module folders to a location that can be made accessible to the offline system.
    Example: USB Flash Drive, Internal File Share, etc.

Online System with PowerShell 4.0 or 3.0 without the PowerShellGet module:

  • Download and install the ‘PowerShellGet’ module by way of the PackageManagement PowerShell Modules MSI.
  • Open PowerShell
  • Use the ‘Save-Module’ cmdlet to download the PowerCLI modules locally. Example:
    • If requested, update the NuGet provider
    • If requested, trust the ‘Untrusted repository’ that is named PSGallery
      Note: This is a local system trust, not something that has something to do with an SSL certificate
  • Copy those downloaded module folders to a location that can be made accessible to the offline system.
    Example: USB Flash Drive, Internal File Share, etc.
Save-Module Example and associated output

Adding PowerCLI to the Offline System

It’s now time to put the PowerCLI modules on to the offline system. To take advantage of the magic that is module auto-loading, we’ll want to copy and paste those downloaded folders in one of the locations listed in the PSModulePath variable.
By default, the PSModulePath variable contains the following directories:
  • $home\Documents\WindowsPowerShell\Modules
  • $pshome\Modules
When everything is all said and done, you should have one of the directories listed above looking a bit like this:
Directory Structure with PowerCLI Modules on the Offline System
That’s it! Open a PowerShell session and start using your PowerCLI commands as you did before!

Wait… It’s Not Working For Me!

What happens when you go through the above instructions and it’s not working?
The most common scenario we’ve come across is where the ‘Save-Module’ cmdlet was used with an online system that has PowerShell version 5.x. When this happens, there are an additional level of folders created between the top-level module folder and the module files themselves. This is extremely beneficial because we can then have multiple versions of the same module available on the local system. The issue though, older versions of PowerShell do not recognize those folders and therefore cannot load the modules.
When I say issue, I truly mean it. Jake Robinson, the PowerCLI Product Manager, actually created a GitHub issue for PowerShellGet calling out this problem: Offline installation of modules from Save-Module does not work on PS <5.x
Good news though, there are a couple workarounds available!
First option: Upgrade your version of PowerShell on the offline system to 5.x with Windows Management Framework 5.0.
Second option: Find an online system that has PowerShell versions 4.0 or 3.0 installed and use ‘Save-Module’ on that system.
Those two options are simple enough, but generally in an ‘easier said than done’ manner. With that said, I’m very excited to show off a third option. This option doesn’t require installing any software or powering on that older VM you hadn’t decommissioned quite yet. This option is a simple script that is run on the offline system. The script simply looks for the folders that already exist in any of the PSModulePath listed directories, searching specifically for PowerCLI module folders, and then removes that additional nested level of version-based folders.
The script is openly available on the PowerCLI Community Repository and is named: PowerCLI_FixNestedFolders.ps1
Here’s an example of the script in action:
Fixing the nested PowerCLI folders on older versions of PowerShell
Here’s an example of the results: (Left is the before, right is the after)
Directory Structure Before, left, and After, right

Wrap-Up

PowerCLI has seen a lot of success on the PowerShell Gallery. A set of modules with over 2,000,000 combined downloads is pretty impressive! However, there’s still a lot of questions over the installation process for systems that are offline. This blog post walked us through the offline installation process, covers the most common issue users hit, and provides a new solution to help overcome that issue.
Don’t delay, upgrade your version of PowerCLI on all your systems to ensure you’re getting access to the most up-to-date features, performance improvements, and bug fixes today!
If you’re looking to install PowerCLI and have direct internet access, use the following link: PowerCLI – Online Walkthrough
If you’re looking to install PowerCLI on a MacOS based system, use the following link: PowerCLI – MacOS Installation Walkthrough